The Motomaster Eliminator Battery Charger is an intelligent, multi-stage charging solution designed for 12V lead-acid batteries. It offers advanced features like automatic charging and built-in safety protections.
Overview of the Motomaster Eliminator Battery Charger
The Motomaster Eliminator Battery Charger is a versatile and intelligent charging solution designed for 12V lead-acid batteries. It is ideal for vehicles, boats, and other applications requiring reliable battery maintenance. The charger features a multi-stage charging process, ensuring optimal performance for wet-cell, maintenance-free, and gel-cell batteries. With its built-in intelligent microprocessor, it automatically detects battery type and adjusts charging modes accordingly. This makes it a user-friendly option for both novice and experienced users. The charger is also designed with safety in mind, offering protections against overcharging, reverse polarity, and electrical surges. Its rugged construction and efficient design make it a practical choice for everyday use and long-term battery health.
Key Features of the Motomaster Eliminator Battery Charger
The Motomaster Eliminator Battery Charger boasts several key features that enhance its functionality and user experience. It includes a multi-stage charging process optimized for various 12V lead-acid batteries, such as wet-cell, maintenance-free, and gel-cell types. The charger is equipped with a built-in intelligent microprocessor that enables automatic detection of battery type and adjustment of charging modes. Safety features like reverse polarity protection and overcharge prevention ensure secure operation. Additionally, the charger is designed with a rugged and efficient construction, making it suitable for both home use and professional applications. Its user-friendly interface and comprehensive charging options make it a reliable choice for maintaining and extending battery life.
Installation and Setup
Ensure the charger is placed on a stable, well-ventilated surface away from heat sources. Follow the manual’s step-by-step guide for proper connection and setup procedures.
Pre-Installation Checks and Requirements
Before installing the Motomaster Eliminator Battery Charger, ensure compatibility with your 12V lead-acid battery. Inspect terminals for corrosion or damage and clean them if necessary. Secure the charger on a stable, well-ventilated surface away from heat sources and flammable materials. Verify all electrical connections are tight to prevent arcing. Review the manual for specific voltage and charging mode requirements. Ensure the charger is not exposed to moisture or extreme temperatures. Always wear protective gear during setup; Failure to follow these guidelines may result in safety hazards or improper charging. Proper preparation ensures safe and efficient operation of the charger.
Step-by-Step Installation Guide
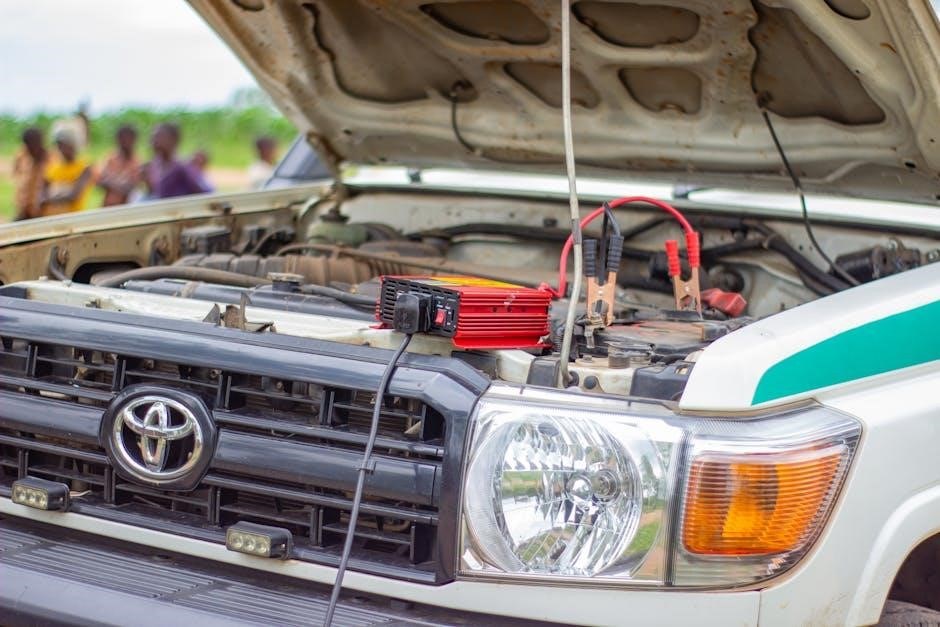
Begin by unpacking the Motomaster Eliminator Battery Charger and ensuring all components are included. Choose a well-ventilated, stable surface for installation, away from flammable materials. Mount the charger using the provided brackets to prevent movement during operation. Connect the charger to a reliable power source, ensuring the circuit can handle the current. Attach the positive (red) and negative (black) cables to the battery terminals, avoiding reverse polarity. Secure all connections tightly to prevent loosening. Turn on the charger and select the appropriate charging mode based on your battery type. Refer to the manual for specific settings and adjustments. Proper installation ensures safe and efficient charging performance. Always follow the sequence outlined in the manual to avoid errors.
Operating the Motomaster Eliminator Battery Charger
Operating the charger involves connecting it to the battery, selecting the appropriate charging mode, and monitoring the process. The intelligent microprocessor ensures optimal charging for various 12V batteries.
Connecting the Charger to the Battery
Connecting the Motomaster Eliminator Battery Charger to the battery requires careful attention to ensure safety and proper function. First, ensure the charger is turned off before making any connections. Locate the positive (+) and negative (-) terminals on the battery, ensuring they are free from corrosion or damage. Attach the positive (red) cable from the charger to the positive terminal and the negative (black) cable to the negative terminal or a suitable grounding point. Avoid reverse polarity, as this can damage the charger or battery. If the charger indicates a reverse polarity error, disconnect and recheck the connections. Proper connection is essential for safe and efficient charging. Always refer to the manual for specific guidelines.
Selecting the Correct Charging Mode
Selecting the correct charging mode on the Motomaster Eliminator Battery Charger is crucial for optimal performance and battery health. The charger offers multiple modes tailored for different battery types, such as wet-cell, maintenance-free, and gel-cell batteries. Ensure the mode matches your battery type to avoid undercharging or overcharging. For deeply discharged batteries, use the “Deep Cycle” or “Recovery” mode. For regular maintenance, the “Trickle Charge” or “Float” mode is recommended. Always consult the manual to confirm the appropriate mode for your specific battery. Incorrect mode selection may lead to inefficient charging or potential damage to the battery. Adjust settings carefully to ensure safe and effective charging.
Safety Precautions and Guidelines
Ensure proper ventilation, avoid closed spaces, and keep flammable materials away. Never place the battery on the Motomaster Eliminator Battery Charger or allow acid to drip on it.
Important Safety Instructions for Users
Always follow these guidelines when using the Motomaster Eliminator Battery Charger. Ensure the charger is used in a well-ventilated area, away from open flames or sparks. Avoid placing the battery on top of the charger and prevent battery acid from dripping onto the device. Do not modify the charger or use it near flammable materials. Keep children away and avoid touching the terminals with bare hands. Never charge a frozen battery or one with damaged terminals. If the charger is damaged, discontinue use immediately. Follow proper connection procedures to avoid short circuits. Regularly inspect cables and connections for wear or damage. Always refer to the manual for specific safety guidelines and charging instructions to ensure safe operation and prevent potential hazards.

Preventing Common Hazards

To prevent common hazards when using the Motomaster Eliminator Battery Charger, ensure proper ventilation and avoid operating the charger in confined spaces. Regularly inspect the battery terminals for corrosion or damage, as this can disrupt electrical connections. Clean terminals with a wire brush if necessary. Avoid overcharging, as it can lead to battery damage or overheating. Never charge a frozen or damaged battery, as it may burst. Store the charger in a dry, cool place, away from flammable materials. Always disconnect the battery before cleaning or servicing the charger. Use the charger only for lead-acid batteries, as specified in the manual. Properly follow all safety guidelines to minimize risks and ensure safe operation.

Troubleshooting Common Issues
Check connections for corrosion or damage and ensure proper battery compatibility. Refer to error codes in the manual for diagnosing and resolving charging issues effectively.
Identifying and Resolving Charging Problems
Common issues with the Motomaster Eliminator Battery Charger include reverse polarity warnings or failure to charge. Check for terminal corrosion or damage, as this can disrupt connections. Ensure cables are securely attached and free from damage. If the charger shows an error code, refer to the manual for specific troubleshooting steps. Incorrect charging mode selection may also prevent proper charging. Verify compatibility with your battery type, as the charger is designed for 12V lead-acid batteries. For persistent issues, consult the manual or contact customer support. Regular maintenance, like cleaning terminals, can prevent many charging problems. Always follow safety guidelines to avoid further complications.
Understanding Error Codes and Indicators
The Motomaster Eliminator Battery Charger uses error codes and LED indicators to signal issues. A steady red light may indicate reverse polarity, while flashing lights can signal overvoltage or short circuits. Refer to the manual for code meanings. Error codes like “E1” or “E2” often relate to battery or connection problems. If an error occurs, disconnect the charger, check connections, and restart. For persistent codes, ensure the battery type matches the charger’s settings. Cleaning corroded terminals can resolve many issues. Always follow the manual’s troubleshooting guide to address errors safely and effectively. Properly understanding these indicators ensures optimal performance and prevents damage to both the charger and battery.
Maintenance and Care
Regularly clean the charger’s terminals and ensure proper ventilation. Store it in a dry, cool place away from direct sunlight. Avoid extreme temperatures and moisture exposure.
Regular Maintenance Tips
Regular maintenance is crucial for optimal performance of the Motomaster Eliminator Battery Charger. Clean the terminals periodically using a wire brush to prevent corrosion buildup. Inspect the charging cables for any signs of wear or damage and replace them if necessary. Ensure the charger is stored in a cool, dry place, away from direct sunlight and moisture. Avoid exposing the charger to extreme temperatures, as this can affect its efficiency. Always follow the manufacturer’s guidelines for long-term storage to preserve the charger’s longevity. Proper care ensures reliable operation and extends the lifespan of the Motomaster Eliminator Battery Charger.
Storage and Longevity of the Charger
Proper storage is essential to maintain the longevity of the Motomaster Eliminator Battery Charger. Store it in a cool, dry environment, away from direct sunlight and moisture. Avoid exposing the charger to extreme temperatures, as this can degrade its internal components. Ensure the charger is unplugged during storage to prevent any accidental power surges. If storing for extended periods, charge the charger to half capacity to prevent deep discharge. Clean the terminals before storage to prevent corrosion. Follow these guidelines to ensure the charger remains in optimal condition and serves you effectively for years to come.
The Motomaster Eliminator Battery Charger is a reliable and efficient solution for maintaining and charging 12V lead-acid batteries. With its advanced multi-stage charging process and intelligent microprocessor, it ensures optimal performance and safety. By following the guidelines outlined in the manual, users can maximize the charger’s longevity and effectiveness. Proper storage, regular maintenance, and adherence to safety precautions are key to extending its lifespan. Whether for vehicles, marine applications, or other equipment, this charger delivers consistent results. Always refer to the manual for troubleshooting and operational guidance to ensure safe and efficient charging experiences.